
Cavity Wall Insulation Risks: A UK Homeowner’s Guide
You've bought a house in Forest Hill, Lewisham or Bromley and the survey has raised a question about cavity wall insulation. Or you've lived there for years, had insulation installed through a scheme and now you're seeing a tide mark, mould or a cold patch after rain. The immediate temptation is to blame the insulation itself and assume the whole wall needs stripping out.
That's often the wrong starting point. Cavity wall insulation is a condition-sensitive system. The defect may be failed pointing, a blocked weep hole, debris in the cavity, wind-driven rain or poor installation. Those details affect the repair, the valuation, the insurance position and the evidence you'll need before spending money.
Table of Contents
- What Most Homeowners Get Wrong About Cavity Wall Insulation
- How Cavity Wall Insulation Fails
- Where Cavity Wall Insulation Poses the Highest Risk
- Warning Signs and What a Surveyor Will Check
- How CWI Problems Affect Surveys, Valuations and Insurance
- Remediation Options When Cavity Wall Insulation Goes Wrong
- What to Do Next and When to Call a RICS Surveyor
What Most Homeowners Get Wrong About Cavity Wall Insulation
A buyer in Torfaen notices a tide mark on the living-room wall. White insulation boards were pumped into the cavity during a free insulation scheme in 2018. The mark appeared months later, after a spell of driving rain. The owner assumes the work must have met the standard in force at the time. That assumption can leave them chasing the wrong party.
Legacy guarantees vary by installer and scheme. They may not cover every moisture-related defect, particularly where the actual cause is defective pointing, a leaking detail or unsuitable exposure. The first question isn't “how do we remove the insulation?” It's “how is water getting through this wall?”
The same issue appears in Clackmannanshire, Torfaen and across London. A Victorian terrace in Lewisham may have a narrow or irregular cavity with mortar snots and rubble left behind. A 1930s semi in Bromley may have a more consistent wall, but an exposed gable, cracked render or failed window seal can still provide a route for water.
The cavity on paper is not the cavity on site
Original cavity construction assumes a clean gap between the outer brick leaf and the inner block leaf. In practice, mortar droppings, uneven brickwork and wall ties occupy parts of that space. Once insulation is added, those imperfections can become a contact point between the wet outer leaf and the inner wall.
The material may be bead, mineral fibre, foam or another approved product. That choice matters, but it doesn't override the building's condition. A well-specified installation in a suitable wall can perform properly. A poor installation can turn a drainage gap into a moisture pathway.
Practical rule: Treat the insulation, the cavity, the outer wall and the internal environment as one system. Don't approve extraction until someone has established the route of the water.
The Northern Ireland Housing Executive's 2019 research is useful because it separates serious internal damage from the wider quality problem. 63% of surveyed Housing Executive properties had cavity wall insulation installations that were non-compliant with current industry standards, with voids and debris in the cavity, according to the Northern Ireland Housing Executive research report. In just over 84% of properties, deterioration to the external façade had allowed or could allow water into the cavity, while only 1.1% had conditions that had compromised the internal fabric and caused damp.
That distinction matters for a buyer. The common failure is not automatically catastrophic internal damage. It's a combination of poor installation and a defective external envelope. The next step is to identify which physical route is operating at the property.
How Cavity Wall Insulation Fails
CWI fails through a small number of physical routes. They often overlap, so one damp patch rarely explains the whole defect.
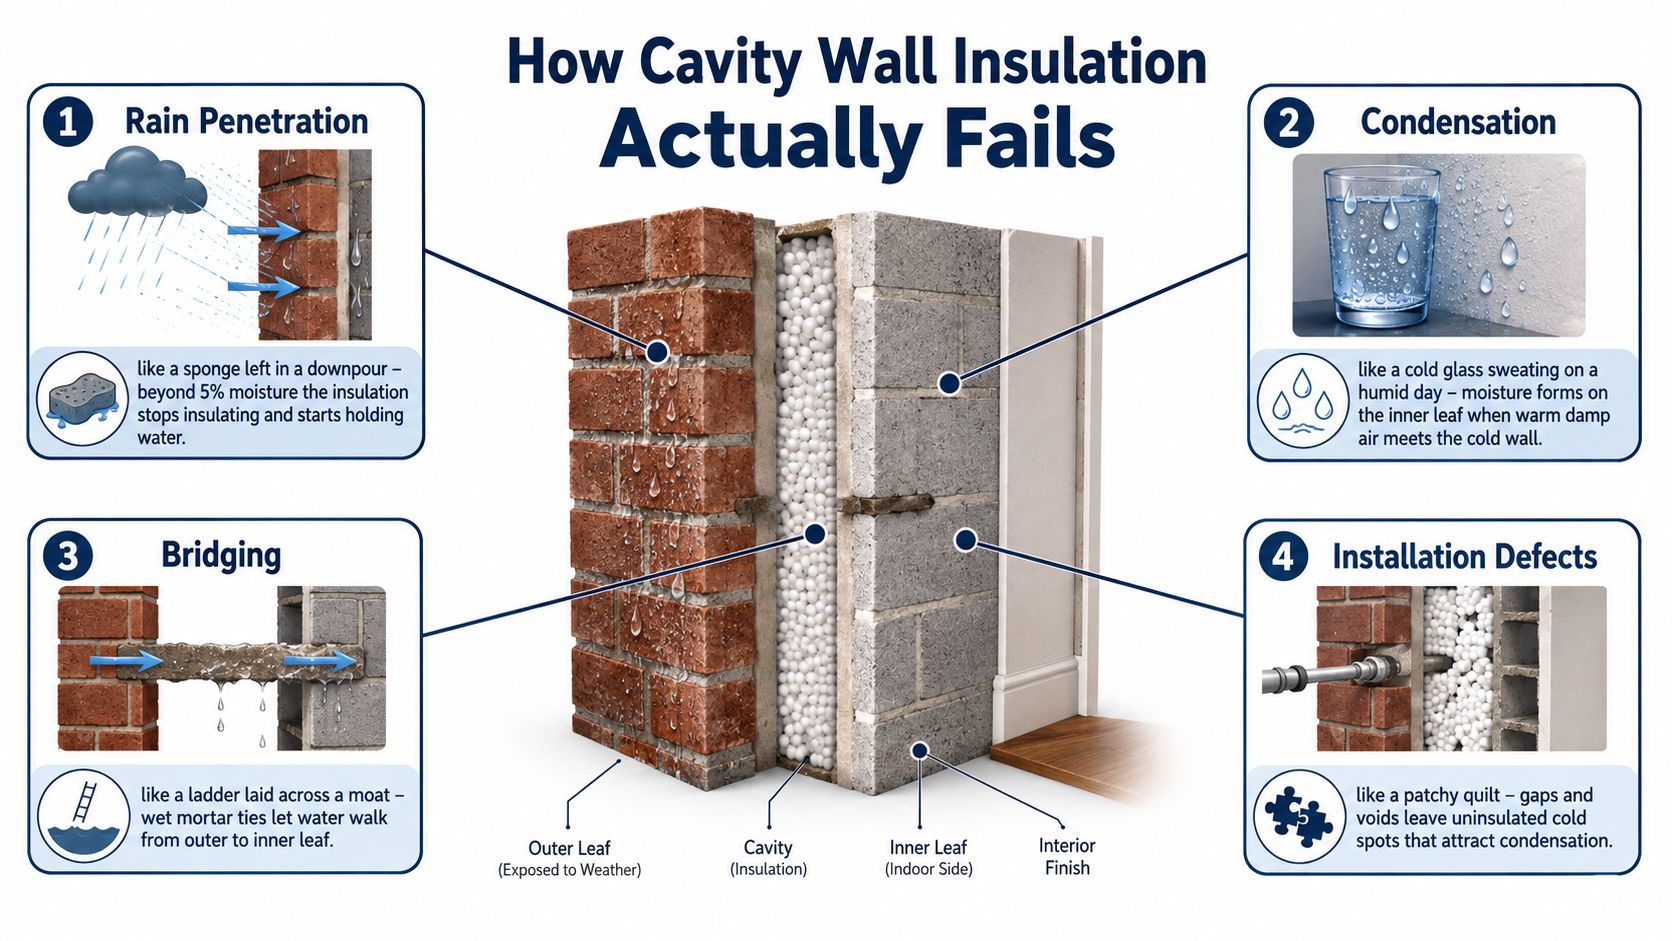
Rain penetration
Wind-driven rain saturates the outer leaf. If wet insulation is pressed against the inner leaf, water can track across the cavity. The result is a wet sponge pressed against plaster. The insulation stops acting as a dry thermal layer and becomes part of the moisture route.
Government guidance describes damp linked to CWI as rare, but confirms that high exposure to wind-driven rain can create problems. Many insulation types absorb and retain moisture after rain enters the wall. Thermal performance falls, and moisture can transfer towards the internal surface. The government guidance on projected wind-driven rain explains this mechanism.
Condensation
Warm, moisture-laden air from cooking, bathing or drying clothes reaches a colder surface within the wall build-up. Moisture forms at the dew point, like a cold can sweating on a warm day. Blocked vents and poor air movement worsen the internal symptoms.
Bridging
Mortar droppings, rubble and defective wall ties can connect the outer and inner leaves. A ladder laid across a moat describes the effect. Water no longer needs to cross a clear cavity because the obstruction provides a route.
Settlement and voids
Loose-fill insulation can compact at the base after poor installation or movement of the material. Voids remain higher up, while the lower section can retain moisture. Patchy filling creates cold spots and uneven thermal performance.
These routes can operate together. A bridge on an exposed south-west elevation may start rain penetration. Internal condensation can then settle on colder areas, making the visible damage appear more widespread.
Full-fill systems have less spare drainage and drying capacity than a clear cavity. Assess the material, fill pattern and exposure together before deciding on extraction. The guide to how to fix water damaged insulation provides practical background on wet material. If the symptoms may involve ground moisture instead, review this explanation of what causes rising damp. That distinction affects the repair scope, valuation advice and the cost of putting the property right.
Where Cavity Wall Insulation Poses the Highest Risk
Cavity wall insulation isn't equally suitable across the UK. Exposure is the first geographical filter, not an afterthought after the holes have been drilled.
BRE exposure zoning is commonly used in practice. Zones 3 and 4 cover areas associated with greater wind-driven rain, including much of Wales, west Scotland, Cornwall, Devon, Somerset and the north-west coast. The Energy Saving Trust advises against CWI on homes exposed to extreme weather or flooding and identifies cavities under 50 mm as especially unsuitable in the wrong circumstances, as explained in its cavity wall insulation guidance.
The south-east, including much of London, generally presents a different exposure profile. That doesn't give every property a clean bill of health. A gable facing the prevailing wind, a coastal location, a hillside cutting or failing external masonry can put one elevation at greater risk than the postcode suggests.
| Exposure zone | Typical UK locations | Property types most at risk | CWI suitability |
|---|---|---|---|
| Zone 4 | Western Scotland, much of Wales, the Lake District and parts of Cornwall and Devon | Narrow or dirty cavities, exposed gables, porous masonry and walls facing driving rain | High risk. Full-fill retrofit needs very careful design and may be unsuitable |
| Zone 3 | Much of the west coast and Pennine fringes | Pre-1980s masonry with mortar residue, defective pointing and render-only outer leaves | Restricted. The wall and product need specific assessment |
| Zones 1 and 2 | Drier eastern and south-eastern areas, including much of London | Defective elevations, narrow cavities and blocked drainage details | More favourable, but only where the wall is sound and the installation is compliant |
The current exposure guidance makes cavity width a specific control. In very severe exposure locations, fair-faced masonry with full-fill insulation is allowed only where the cavity is at least 150 mm, under the relevant conditions in the Knauf Insulation exposure guidance.
That isn't a universal London rule or a licence to fill every cavity in Lewisham. It's a reminder that material, cavity width, wall finish and exposure work together. A useful summary of the retrofit split between lower and higher exposure zones is provided by UK cavity wall insulation exposure guidance.
Warning Signs and What a Surveyor Will Check
You can identify warning signs without opening the wall. You can't reliably establish causation by looking at one damp patch.
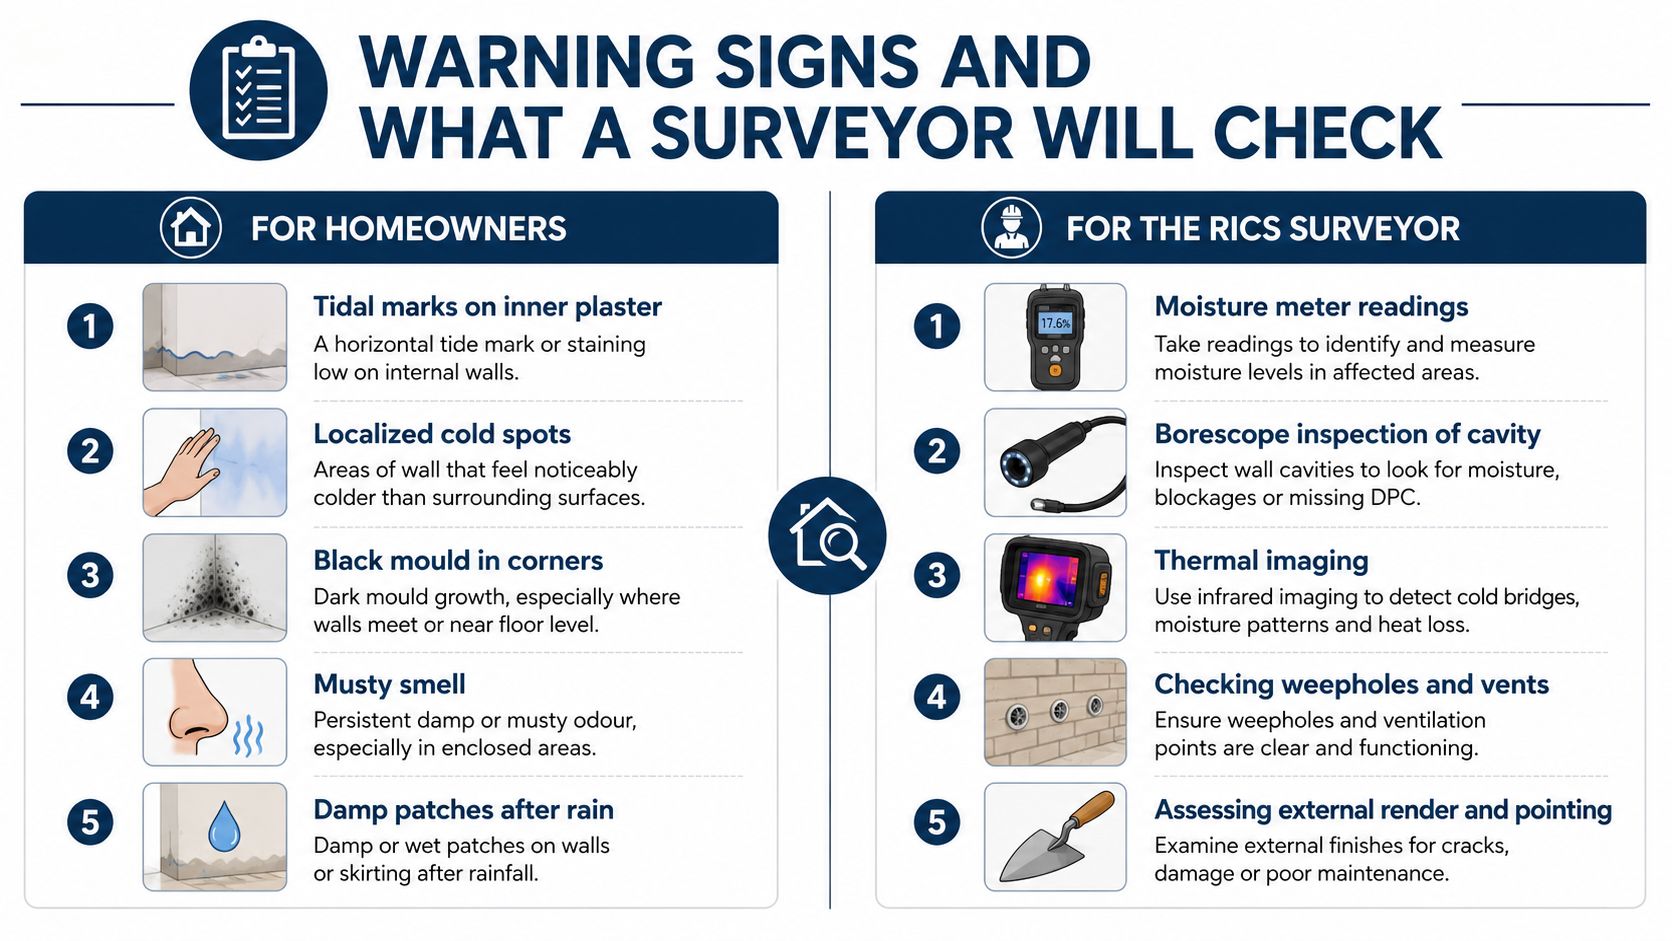
A homeowner should record changes rather than paint over them. Look for:
- Tide marks: Dark or discoloured lines on plaster, particularly on an external-facing wall.
- Cold spots: Local areas that feel colder than adjacent sections, even when the heating is running.
- Black mould: Mould in corners or around reveals, especially where the pattern follows a cold bridge.
- Blown finishes: Render, paint or plaster that has lifted, blistered or started to detach.
- Blocked details: Insulation visible at an air brick, blocked weep holes or covered ventilation openings.
- Rain-related symptoms: A damp smell or wet patch that becomes worse after wind-driven rain.
Photograph each defect with the date and location. Note which elevation it sits on, whether it faces south-west and whether the symptoms change after rainfall. A plain record is more useful than a diagnosis based on guesswork. This additional guide to spotting hidden water damage in walls can help you organise the observations.
What the inspection needs to establish
A surveyor starts with the outside. They inspect pointing, brickwork, render, sealant around windows and doors, gutters, downpipes, air bricks and weep holes. They then compare those findings with the internal pattern.
The diagnostic tools answer different questions:
- Moisture meter profile: Readings at skirting level and mid-height help establish the distribution of moisture. A single high reading doesn't identify the source.
- Thermography: A thermal camera maps colder areas and can indicate voids, bridging or uneven insulation.
- Borescope inspection: An inspection through an air brick or suitable opening can identify fill material, debris, voids and signs of saturation.
- Hygrometer monitoring: Readings over 24 to 48 hours can help separate a persistent building defect from a short-lived internal humidity event.
A surveyor may also look for poorly cut tops, blocked weep holes and sulphate contamination. The inspection should state what was seen, what wasn't accessible and what further opening-up is justified.
A seller can disclose that insulation is present and that damp symptoms have appeared. Evidence about the cause, extent and remedy usually needs a Level 3 Building Survey or targeted defect investigation. A Level 2 report can flag a concern, but it isn't a substitute for intrusive evidence where the wall system is in dispute.
How CWI Problems Affect Surveys, Valuations and Insurance
A CWI concern changes the survey conversation because the defect can affect both condition and marketability. The report should not say “damp present” and leave the buyer to guess. It should identify the observed defect, likely routes and the limits of the inspection.
A Level 2 HomeBuyer report may place the concern under dampness and apply Condition Rating 3 where urgent investigation or repair is needed. A Level 3 Building Survey can describe the insulation as a contributing defect in greater detail, particularly in a badly affected Victorian terrace. The exact rating depends on the evidence and the reporting standard. Don't treat a traffic-light rating as a repair specification.
| Issue found | Level 2 report condition rating | Level 3 report severity | Mortgage valuation impact | Insurance implication |
|---|---|---|---|---|
| Isolated cold spot with no confirmed moisture route | May be Rating 2 or require further investigation | Local defect assessment and monitoring | Lender may ask for evidence before proceeding | Disclose relevant facts when asked |
| Damp linked to defective pointing or failed seals | Often Rating 3 if the cause needs urgent attention | External envelope repairs and internal consequences assessed | Retention, down-valuation or a request for remedial evidence may follow | Insurer may treat the cause as maintenance rather than an insured event |
| Wet or poorly installed insulation across an elevation | Rating 3 where the defect is significant and unresolved | Scope of investigation, extraction and reinstatement considered | Lending can be delayed or declined if risk remains uncertain | Policy wording, exclusions and the installation guarantee become important |
A mortgage valuation isn't a building investigation. The valuer may flag the apparent defect, request a specialist report, apply a retention or adjust the valuation. A lender can also refuse to rely on an optimistic contractor's note if the underlying cause hasn't been established.
Insurance requires care with disclosure. Policy wording can address material facts, latent defects and maintenance-related damp in different ways. A CWI-related moisture problem may be treated as a maintenance issue rather than a covered peril. Read the policy and ask the insurer a precise question after you have a proper diagnosis. For general context, this explanation of understanding storm damage claims shows why the cause of water entry matters.
For buyers: Don't negotiate from the word “insulation” alone. Negotiate from the confirmed defect, the likely scope of work and the risk that the lender or insurer will ask the same questions later.
Resale is where weak evidence becomes expensive. Future buyers may ask for installation records, guarantees, inspection reports and proof that external repairs were completed. In flats, buyers may also raise EWS1-style enquiries as part of wider building-risk checks, although CWI isn't the same issue as cladding. An independent RICS property valuation can help establish the effect of a documented defect on market value, but it won't replace a technical diagnosis.
Remediation Options When Cavity Wall Insulation Goes Wrong
There are three honest routes. The correct one depends on the material, the wet area, the external defect and the condition of the cavity. Extraction isn't automatically the best answer.
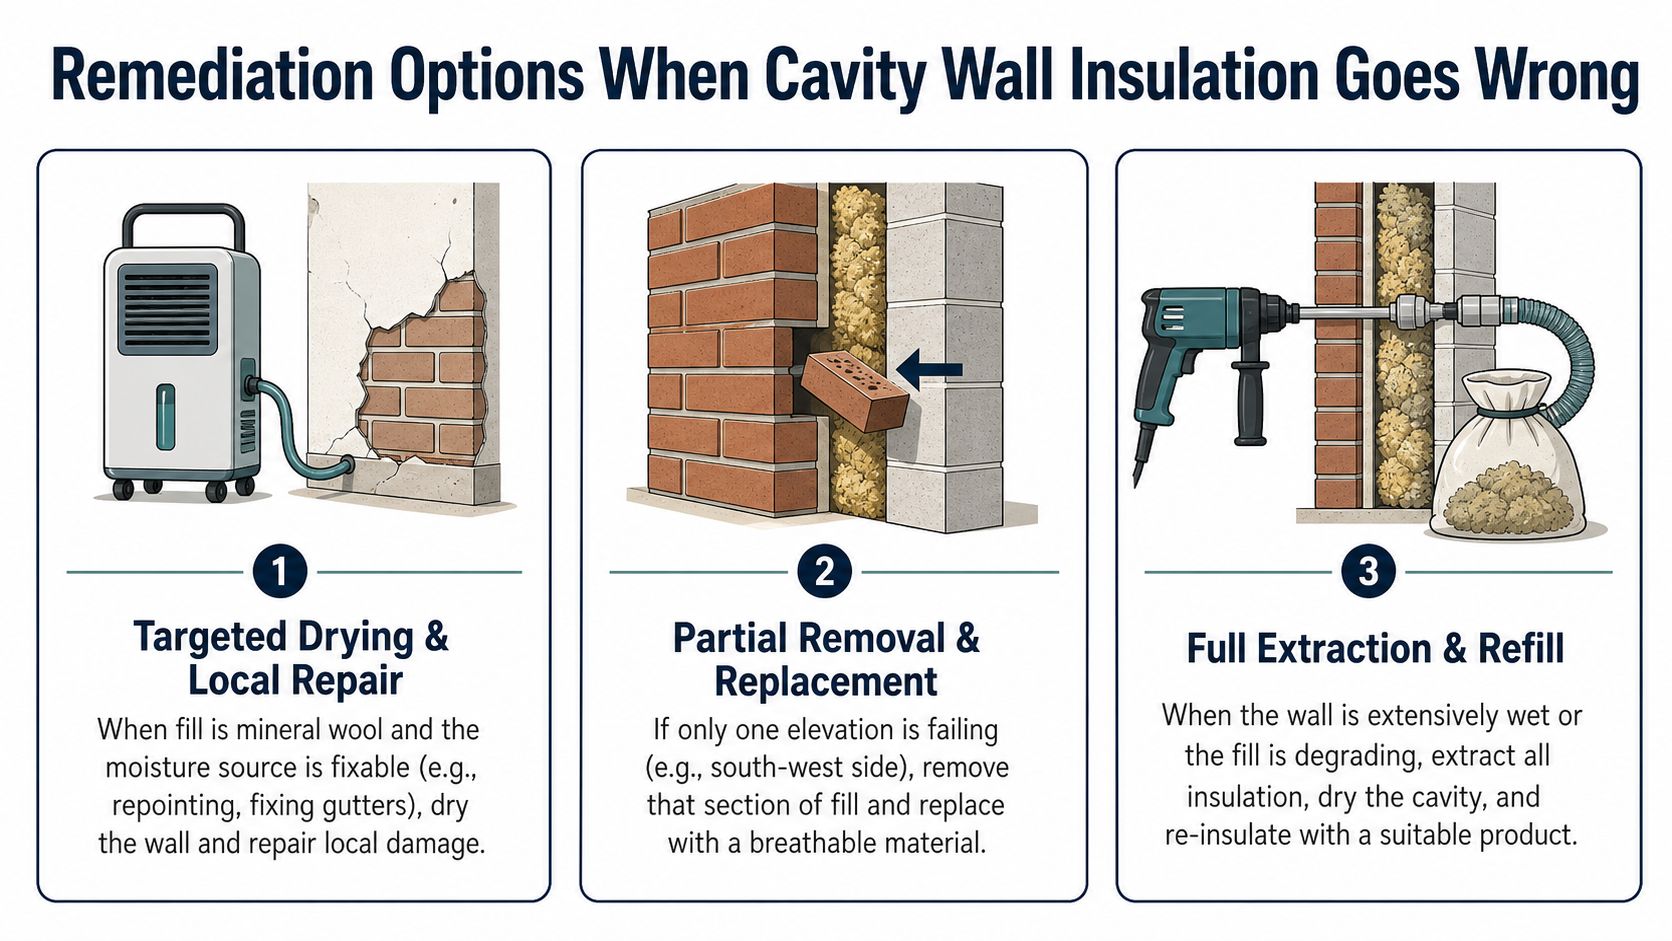
Targeted drying and local repair
This can suit mineral fibre insulation where the moisture source is clear and localised. The work may involve repointing, repairing render, replacing defective sealant, fixing gutters or correcting a drainage detail. The wall then needs time and monitoring to dry before internal finishes are renewed.
Don't use a dehumidifier to conceal an active leak. Drying is only sensible after the water entry route has been addressed.
Partial removal
Partial extraction is a real option. If one elevation or bay is failing, specialist equipment can remove insulation through access points and the remaining sections can be assessed. This may be suitable where the south-west wall is exposed but the sheltered elevations are sound.
The report should explain why the affected section has been identified. Removing one area without checking adjacent fill can leave the cause unresolved.
Full extraction and refill
Full extraction is invasive. It involves removing insulation across a wider elevation or the whole wall, drying the cavity and deciding whether a suitable replacement is justified. In some cases, the correct outcome is a repaired cavity with no refill until the wall has proved dry and suitable.
The main cost drivers are:
- Wall size: Larger elevations require more access points and more making good.
- Access: Scaffolding, restricted side passages and neighbouring land can change the work.
- Render type: Render may require broader reinstatement than face brickwork.
- Material: Beads, mineral fibre and foam have different removal characteristics.
- Building form: A terraced house, semi-detached house and detached house present different access and party-wall considerations.
A surveyor should also call out external repairs. Owners sometimes jump to extraction when the immediate defect is failed pointing or a leaking gutter. Equally, replacing render alone won't solve insulation that is saturated, badly bridged or broadly non-compliant.
What to Do Next and When to Call a RICS Surveyor
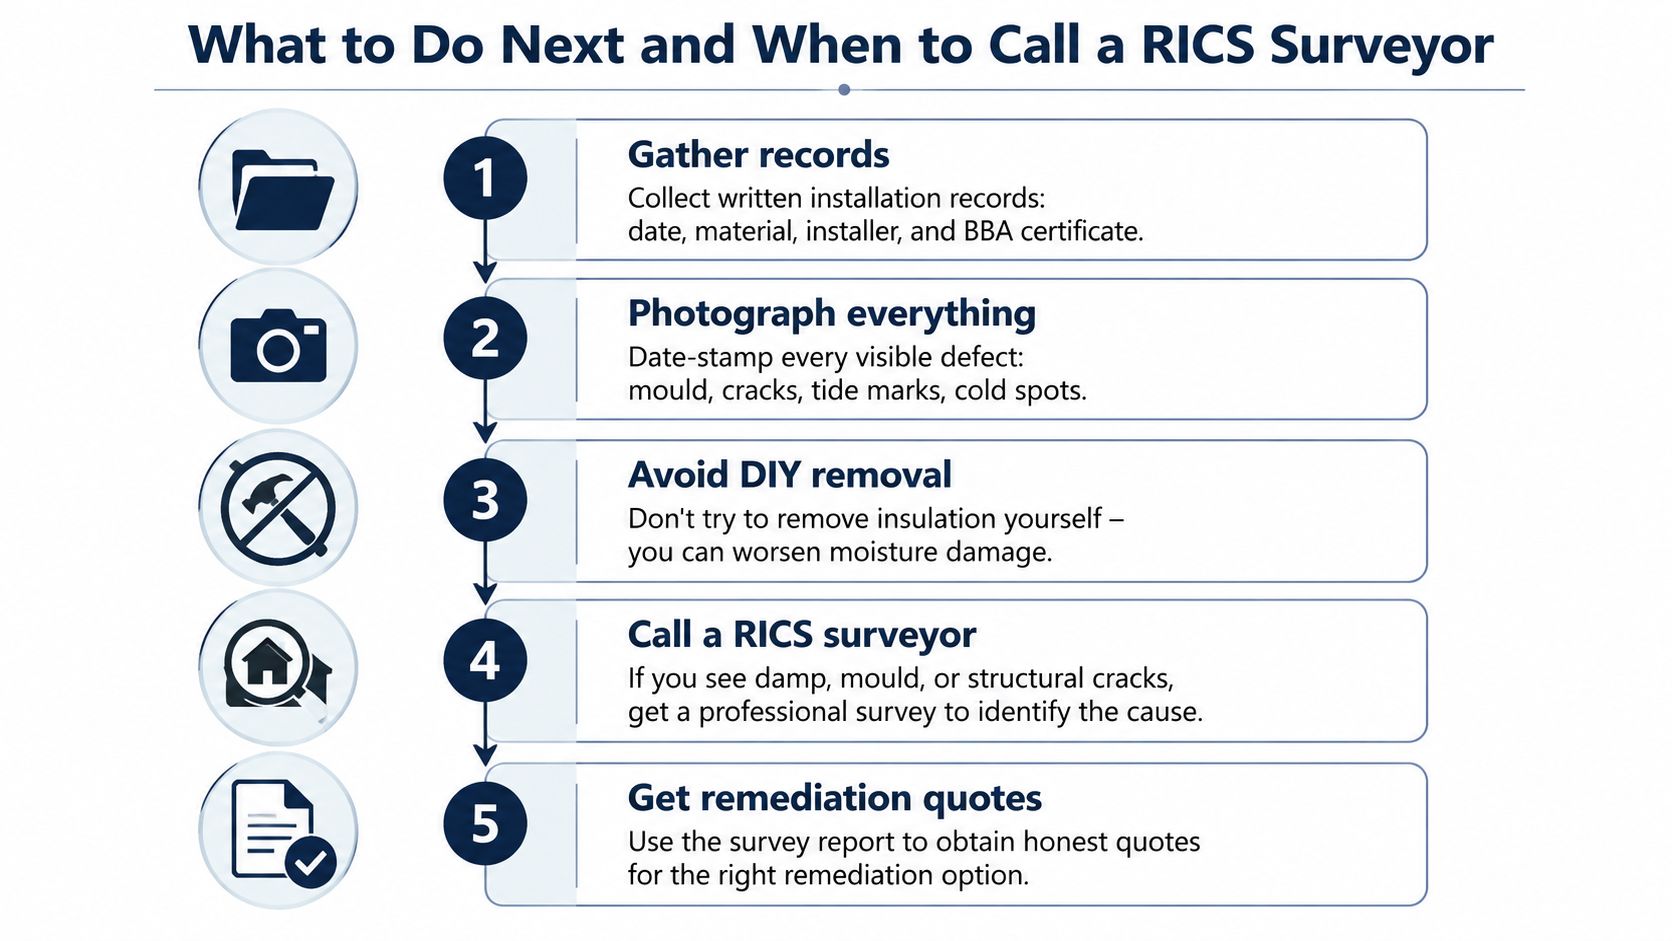
Start with evidence. Find the installation date, material, installer, guarantee, product information and any BBA certificate. Check the external wall records too, including repointing, render repairs, window replacements and drainage work.
Take dated photographs of every mark, cold spot, crack, mould patch and damaged finish. Keep a short weather log. Note whether the defect worsens after rain and whether it appears on one elevation or several.
Use this decision route
- Check the original installer: If the work may still fall within its guarantee, notify the installer in writing and keep the response.
- Check the guarantee provider: Look for the relevant cavity wall insulation guarantee, including CIGA documentation where applicable.
- Use an independent surveyor: Don't rely solely on the contractor's own inspector. You need an impartial view of the wall, the moisture route and the likely remedy.
- Avoid DIY removal: Pulling out insulation without a plan can damage finishes, block openings or make the evidence harder to interpret.
- Obtain remedial quotations: Get quotations after the defect report has defined the work. Otherwise you may receive a price for the wrong repair.
A regulated RICS surveyor can provide a Level 2 or Level 3 report in a format recognised by many lenders and insurers. The report may also help if you challenge the installer, pursue a guarantee claim or escalate a complaint to the relevant scheme or Property Ombudsman.
Professional advice is essential where there are visible damp patches, cold spots that don't dry, mould after rainfall, mortgage valuation flags or questions at insurance renewal. A Level 3 inspection is the stronger choice for an older Victorian terrace in Lewisham, a rendered gable in Croydon or a period property in Greenwich where opening-up and construction details matter. For guidance on the scope of that service, see what is a Building Survey.
Within the next seven days, gather the records, photograph the defects and arrange an independent inspection before accepting an installer's explanation or paying for extraction. Corinthian Surveyors London LTD is an independent Forest Hill practice, with no ties to lenders, estate agents or developers. Led by Clive Thompson, who holds RICS and CABE qualifications and has over 30 years' built-environment experience, the firm can advise on the appropriate residential survey and defect evidence across London. Call 0800 00 16 422 or visit Corinthian Surveyors London LTD to arrange an inspection focused on the actual wall defect, not a generic damp treatment.